Nexus for Payment Method Providers
Note: This document is intended for payment app developers who would like to integrate with Nexus to process payments.
If you are a merchant looking to accept payments through Nexus, click here.
Overview
KOMOJU Nexus is a payment solution that allows customers to pay with any app they choose. With Nexus, merchants can generate a universal QR code for a payment. This QR code can then be scanned by any supporting payment app or system camera.
Our solution allows payment service providers (hereafter, “providers”) to connect and process payments through any merchant with your payment method enabled. Once a provider is connected, customers can start using a provider’s payment app to make purchases by scanning Nexus QR codes.
Terminology
| Term | Description |
|---|---|
| Provider | An organization that runs a payment service |
| Client | The provider's mobile app that users use to make payments |
| Backend | The backend payment system for the Provider |
| Merchant | An individual or business that sells products or services online or offline |
| Customer | A person who buys a product or service from a merchant |
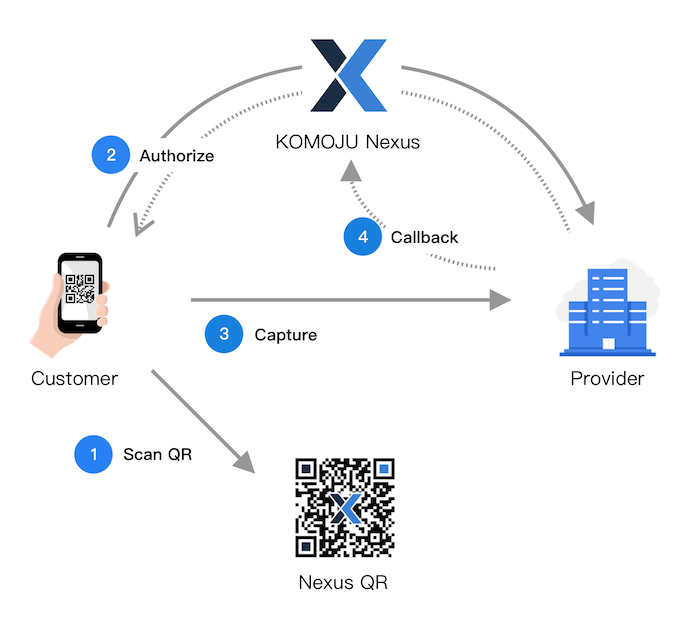
How It Works
- Customer scans Nexus QR code using a Client app or system camera
- Client app sends an authorization request through Nexus to Provider
- Client app captures the payment using authorization response
- Provider sends capture callback to Nexus, completing the payment
Onboarding
Here’s a top-level overview of the Nexus onboarding process. From first contact to accepting payments:
- Register as a Nexus provider
- We’ll get back to you with some tools for testing
- Develop your integration - see Client Integration and Backend Integration
- Inform us when you are ready for release
- Start collecting payments
Registration
To make your payment service available on Nexus, you need to register your service (Provider) to Nexus. For registration, reach out to contact@komoju.com.
The following information is required for the provider registration:
- Provider domain
- Domain name for communication between Nexus and your backend
- Example: "examplepay.com"
- Backend API path
- Appended to your Provider domain to form an API endpoint
- Used for Nexus to initiate authorizations and refunds
- Example: "/nexus/api" would have backend requests sent to "https://examplepay.com/nexus/api"
- See Backend Integration
- Mobile landing path
- Appended to your Provider domain
- Used to open your app for payment directly from the user’s web browser via deep linking or app-schema redirect (up to you)
- Example: "/nexus/activate" would have users redirected to "https://examplepay.com/nexus/activate"
- See Use Cases
- Provider name
- A unique name to identify your client. Alphanumeric and "-" can be used.
- Example: "example-pay"
- Public key
- PEM format
- RSA and ECDSA supported
- See Authentication
Once you have registered, you can start Client Integration and Backend Integration.
Client Integration
This section covers the development work required to implement Nexus on your client (typically a mobile app, but it could be anything - including a website).
The payment flow can start as soon as your client discovers a Nexus Link.
In this document, we show a few examples of Nexus Links:
- https://komoju.com/s/p/dc1y676t3m59hdxx89lfhr6p0
- https://komoju.com/s/p/xxxxx
- etc.
The exact format of these URLs is subject to change. See the verify step for how to identify authentic Nexus Links.
Use Cases
In short, there are 2 customer use cases that your Client must support in order to integrate Nexus. For desktop/external payments, you must support a QR code scanner, and for mobile payments, a redirect scheme.
We also refer to these scenarios as Nexus Link discovery.
Use Case 1: Collect payments initiated on non-mobile devices via QR code
To collect payments made from a desktop application or website, Nexus presents a QR code and asks the customer to pay by scanning that QR code using your client app.
Example Nexus QR code:

When the customer scans the QR code using your client app, you can collect the payment by talking to Nexus’s HTTP API using the QR code data as the Nexus Link.
Case 2: Collect payments initiated on mobile devices via redirect
To collect payments made from mobile websites or apps, Nexus simply redirects the customer to your mobile landing URL in the following form:
https://{endpoint}{mobile_landing_path}?nexus_link=https://komoju.com/s/p/xxxxxxxx
The endpoint and mobile_landing_path fields are specified by you during registration.
You can decide what to do in this case. Typically, you would launch your client app via deep linking or an app-schema. Alternatively, you may carry out payment on a web interface. Either way, you are expected to talk to Nexus’s HTTP API using the nexus_link query param as the Nexus Link.
Completing a payment through Nexus
As soon as you’ve discovered a Nexus Link, you can use it to collect payment.
The Nexus payment flow is a simple 3-step process: verify, authorize, then capture.
These 3 steps are designed so that neither the Nexus server nor the provider’s server can be easily spoofed. A fake Nexus server will be unable to authorize payments, and a fake provider server will be unable to send capture callbacks. See Authentication for details.
Step 1: Verify the Nexus Link
After discovery, your client must verify the integrity of the newly-discovered Nexus Link. Perform a GET request to the link.
## Request
GET https://komoju.com/s/p/xxxxx HTTP/1.1
Content-Type: application/json

## Response
200 HTTP/1.1
Content-Type: application/vnd.nexus-link+json
Nexus-Signature: aaaaaabbbbbbccccccdddddd...

{
  "id": "dc1y676t3m59hdxx89lfhr6p0",
  "resource": "session",
  "type": "payment",
  "timestamp": 11111111
}
In the response, confirm that the Content-Type header is equal to application/vnd.nexus-link+json.
Additionally, please verify our Nexus-Signature header as described in the Authentication section.
This step ensures that your client doesn’t blindly send authorization POST requests to arbitrary endpoints.
Step 2: Authorize the payment through Nexus
After verifying, your client should send a POST request to the Nexus Link with provider set to the value submitted when registering with Nexus:
## Request
POST https://komoju.com/s/p/dc1y676t3m59hdxx89lfhr6p0 HTTP/1.1
Content-Type: application/json

{
  "provider": "your-provider-name-here"
}

## Response
200 HTTP/1.1

{
  "id": "dc1y676t3m59hdxx89lfhr6p0",
  "type": "payment",
  "payment": {
    "id": "1zk24mmsez27d369pp7wqaoen",
    "status": "authorized",
    "amount": 1000,
    "currency": "JPY",
    "payment_details": {
      "type": "nexus",
      "authorization_response_text": "your backend’s response body here"
    },
    ...
  }
}
When you perform this request, Nexus will synchronously make an authorize request to your backend. The raw response body returned by your backend will be included in the payment.payment_details.authorization_response_text field.
Step 3. Capture the payment through your own backend
Before you actually capture, now is a good time to ask for user confirmation on your client app. You can display their remaining balance, the payment amount, etc., and ask them if they’re sure they want to pay.
Using the information contained in authorization_response_text, your client is expected to capture the payment directly with your backend. The way your client communicates with your backend is up to you, and is not governed by this specification. When this capture succeeds, your backend is expected to send a callback to Nexus.
Backend integration
Your backend implementation will need to communicate with Nexus to authorize, refund, and send callbacks when payments are captured on your system.
All requests to and from your backend will be digitally signed using a SHA-2 HMAC signature to ensure secure communication between Nexus and the backend integration. Please refer to the Authentication section for more details.
Integrating with Nexus
Feature 1: Receive authorization requests from Nexus
Nexus will send your backend a reserve payment request to create an authorized payment. To handle this request, you are expected to synchronously create and authorize a payment with your own backend.
POST https://provider/path/to/handler HTTP/1.1
Content-Type: application/json
Nexus-Signature: xxxxxxxxxx

{
  "type": "payment.create",
  "mode": "test",
  "payment": {
    "id": "86rzkcrvcf82s0audo5himdi3",
    "amount": 1000,
    "currency": "JPY",
    "description": "",
    "merchant": {
      "id": "9ccxr6ymcpsyq4fupp7qb6arl",
      "name": "Komoju Mart"
    }
  }
}
For a successful authorization, you can place any arbitrary text in your response body. Since your client app is expected to capture with your backend directly (not through Nexus), we recommend including any internal IDs required for capture.
HTTP/1.1 200
Content-Type: application/json

{
  "success": true,
  "my_internal_transaction_id": "abc123xyz"
}
This arbitrary response will be made available to your client app through the payment.payment_details.authorization_response_text field, similarly to the example shown here.
Feature 2: Receive refund requests from Nexus
Nexus will send your backend a refund payment request when the customer or merchant wishes to perform a refund.
POST https://provider/path/to/handler HTTP/1.1
content-type: application/json
komoju-signature: xxxxxxxxxx

{
  "type": "payment.refund",
  "payment_id": "86rzkcrvcf82s0audo5himdi3",
  "mode": "test",
  "amount": 100
}
If the specified payment cannot be refunded, feel free to return a non-200 HTTP response code or a JSON object containing { "success": false }.
HTTP/1.1 200
Content-Type: application/json

{
  "success": true
}
Feature 3: Send capture callbacks to Nexus
Your client is expected to capture with your backend directly. The way you perform the capture is entirely up to you. Once captured, your backend must send a capture callback to Nexus. The capture callback must include a payment_id parameter matching the one provided when you received the Reserve Payment API request.
POST https://komoju.com/callbacks/providers/provider-name HTTP/1.1
Content-Type: application/json
Nexus-Provider-Signature: xxxxxxxx

{
  "type": "payment.captured",
  "payment_id": "xxxxxxxx" // payment.id provided by Reserve Payment API
}
Error Handling
Most exceptional cases such as the user having insufficient balance are probably already handled by your client. This section will cover what to do in cases where communication between your backend and Nexus is in conflict.
Authorization errors
Under normal operating conditions, the authorization request should never fail. If something exceptional happens, returning a response in this format will greatly assist in debugging.
HTTP/1.1 400
Content-Type: application/json

{
  "success": false,
  "error": { "message": "<your error message here>" }
}
Refund errors
Refunds have many reasons to potentially fail. Even so, we currently have no special behavior for different types of refund failures. Just like for authorization, a response in the following format is preferred in case an investigation is required.
HTTP/1.1 400
Content-Type: application/json

{
  "success": false,
  "error": { "message": "<reason for why the refund failed>" }
}
Callback errors
If Nexus returns a non-200 response code when trying to perform a capture callback, we expect your backend to try again periodically. The exact period is up to you. We are notified of callback errors and will usually resolve them quickly. If there is a payment whose capture callback fails for an excessive amount of time (24+ hours), please contact us and we will work to resolve it.
Example Integration
We have an example Nexus integration (backend + mobile app in JS) here:
github.com/komoju/nexus-example
It’s built using React Native for the client and ExpressJS for the backend. It should be fairly straightforward to build and try it out yourself. If you have any trouble, please file an issue!
Authentication
Nexus uses an asymmetric 2-way authentication scheme for most API calls.
- Asymmetric: public/private key signing - RSA and ECDSA supported
- 2-way: both Nexus and the provider (you) have a public/private key pair
In short, you must sign outgoing requests, and verify incoming requests.
During signup, the provider (you) provides Nexus (us) with a public key. You should never share your private key with anybody. You only need to store your private key on your backend, not on your client. Client requests to Nexus do not need to be signed.
The Nexus public key is always available here.
Signing
When your backend makes requests to Nexus, you are expected to sign them.
Create a SHA-256 signature using your private key and the entire body of the request you intend to send
- Encode the signature using Base64
- Attach the encoded signature to the
Nexus-Provider-Signaturerequest header
Request signing in Javascript
const fs = require("fs");
const crypto = require("crypto");

function createSignature(body) {
  const privateKey = fs.readFileSync('./private-key.pem', { encoding: "utf-8" });
  const sign = crypto.createSign("sha256");
  sign.update(body);
  sign.end();
  const signature = sign.sign(privateKey);

  let base64EncodedSignature = Buffer.from(signature).toString("base64");

  // must be added to the request as the Nexus-Provider-Signature header
  return base64EncodedSignature;
};
Request signing in Ruby
require 'openssl'
require 'json'
require 'base64'

def create_signature(body)
  key_string = File.read('private.pem')
  key = OpenSSL::PKey::EC.new(key_string)
  digest = OpenSSL::Digest::SHA256.new

  signature = key.sign(digest, body.to_json)

  # must be added to the request as the Nexus-Provider-Signature header
  Base64.encode64(signature)
end
Verifying
When Nexus makes requests to your backend, they come with a special signature that you can use to ensure that all backend requests really do come from Nexus. Additionally, some Nexus responses are also signed and can be verified.
- Receive a HTTP request or response from Nexus
- Get the nexus-signature header from the request or response
- Base64 decode the header value to receive the signature
- Compare the signature against the body of the request and the Nexus public key
Verification in Javascript
const fs = require("fs");
const crypto = require("crypto");

function verify(body, headers) {
  let base64Signature = headers["nexus-signature"];
  let publicKey = fs.readFileSync("./nexus-pub.pem", { encoding: "utf-8" });

  let verifier = crypto.createVerify("sha256");
  verifier.update(body);

  let signature = Buffer.from(base64Signature, "base64");

  return verifier.verify(publicKey, signature);
}
Verification in Ruby
require 'openssl'
require 'base64'

def verify(body, headers)
  pem_string = File.read('./nexus-pub.pem')
  komoju_key = OpenSSL::PKey::EC.new(pem_string)

  return if komoju_key.nil?

  b64_signature = headers['HTTP_NEXUS_SIGNATURE']

  return 'Nexus-Signature header not found' if b64_signature.nil?

  signature = Base64.decode64(b64_signature)
  unless komoju_key.verify('sha256', signature, body)
    return 'Invalid Nexus-Signature header (verification failed)'
  end
rescue OpenSSL::PKey::PKeyError
  'Invalid Nexus-Signature header (verification failed)'
end